To install Timeline Mixer, open the Package Manager window, find Timeline Mixer under "My Assets", and click download, and then import.
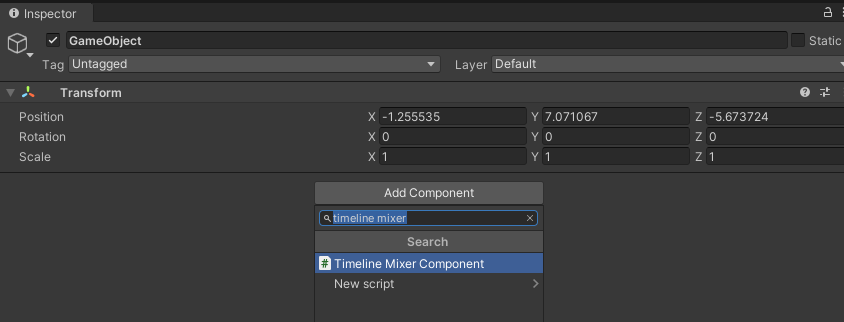
To get started, create an empty GameObject. With it selected, in the Inspector window, click “Add Component.”
Search for TimelineMixerComponent and add it to your GameObject.
You will notice a Playable Director has been automatically added to the GameObject as well. This is required for setup and cannot be removed.
On the Timeline Mixer component, find the Timeline Assets list and set the number of Timeline assets with the Size field.
At the top of the component you can set either Multiple or Solo modes. Multiple mode allows any number of timelines to be active, and Solo mode will allow only one at a time.
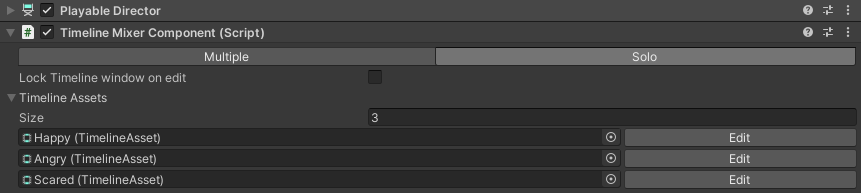
Add your Timeline Assets to the fields in the Timelines list. To edit your timeline, press the “Edit” button next to it on the Timeline Mixer component.
The selected Timeline will be placed in the Playable Director for editing, and the Timeline Window will open. Any changes to bindings or exposed references will be saved in the Playable Director and used to set up Timeline Mixer.
Initializing at runtime
By default, Auto Initialize is enabled on the Timeline Mixer Component. If you disable this option, you must initialize the component manually at runtime.
To initialize the component, call:
This builds the playable graph and prepares all configured timelines for playback.
Uninitializing
To return the component to a dormant, uninitialized state, call:
This will:
- destroy the playable graph
- clear all internal runtime data
After calling Uninitialize, the Timeline Mixer Component cannot be used until Initialize is called again. Playback does not function while the component is uninitialized.
Playback at Runtime
In your script, add the namespace: using TimelineMixer;
Get a reference to the Timeline Mixer component and use the playback methods:
- timelineAsset: The Unity Timeline to play.
- startTime: The timeline time to start playback from. If set to -1 the parameter is ignored.
- fadeTime: The transition time in seconds.
- targetWeight: Unique to the FadeTo method, float 0 - 1, indicates the target strength of the timeline. Partial fades.
- loopPlayback: Can be null, or equal to LoopMode.loop or LoopMode.Endless.
LoopMode.loop will cause the Timeline to loop back to its start time once it exceeds its duration.
LoopMode.Endless will attempt to keep the timeline running beyond its duration, which can be useful with AnimationClips that have Post-Extrapolate set to Continue.
Fast Forward / Rewind
Timeline Mixer has the ability to set the speed and the current time of a timeline. If the speed is set to a negative value, the timeline will play in reverse.
If you need to smoothly reach a specific time in a timeline, you can use the SetTimeSmooth method. This moves the current time to your target time over the duration passed in. You can pass in an animation curve to control easing.
SetTimeSmooth should be called once; do not call it every frame.
If pauseOnEnd is set to true, once the timeline reaches the target time, it will be paused.